FREE SHIPPING ON ORDERS OVER $100! | SAVE BIG $$ WITH THE NEW BLASTER PPE BUNDLE! x

Superior know how

Categories

How to Measure Surface Profile Using Testex Tape

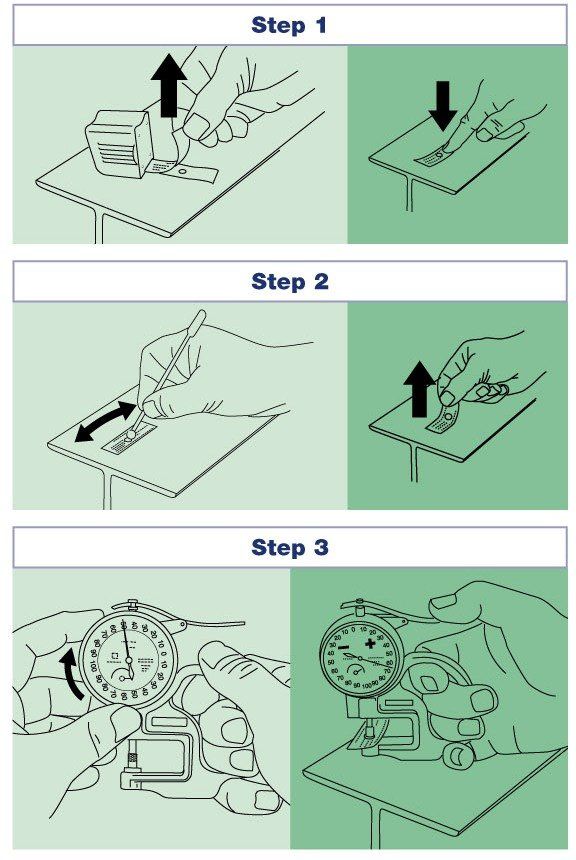
Test Preparation

  • Select a representative test site free of dust, dirt and pitting.
  • Choose the appropriate grade of Testex tape – refer to Inspection Instruments for details of the various scale measurement ranges.
  • Peel a test tape strip from the roll – a ‘bull’s-eye’ marker dot will remain on the slip paper.
  • Apply the tape to the test surface – rub over the tape with a finger to ensure it is firmly adhered.

Perform the Test

  • Using moderate to firm pressure, rub the test window with the round-tip burnishing tool
  • Take care not to dislodge the test tape (caused by bumping the tool against the edge of the circular cutout window).
  • Burnish the test window until it has uniformly darkened – the color indicates the profile has been impressed into the test tape.
  • Peel the test tape strip from the surface.

Measuring the Test Result

  • Use a dial thickness gauge with the correct specifications (i.e. accuracy, anvil spring pressure and anvil size) for replica tape – refer to Inspection Instruments
  • Clean the anvils and check/adjust the zero point.
  • After cleaning and checking the gauge zero point, adjust the dial to minus 2 mils (50 microns) (this compensates for the thickness of the tape carrier film and allows the profile measurement to be read directly from the gauge).
  • Center the test tape between the anvils, gently allow the anvils to close on the tape, and note the reading on the dial.
  • Take several readings to establish accuracy. (Reposition the tape in the anvils between each reading).
how to measure surface profile using testex tape

Sources of Error

There are four major sources of error in determining the profile of a blast cleaned surface, which can be minimized with the following suggestions.

  • Inherent Profile Variation in the surface – perform at least 3 tests per 100 square feet (10 square meters) of area.
  • Contaminant particles in the anvils or tape – select a clean surface; clean and check the anvils; examine the test tape; double check any questionable readings. To indicate the size significance of seemingly tiny contaminants, please note that human hair is approx. 2 mils (50 microns) thick.
  • Improper Gage – a good gauge has an accuracy of ±0.2 mils (±5 microns), closing force of 1.5N and at least one anvil 0.25” (6.3mm) diameter.
  • Deficient Impressing Technique – use a profile training tool to verify the burnishing technique is correct.
DISCLAIMER: Whilst replica tape is recognized by AS1627.4, AS3894.5, ISO8503.5 and other standards, the above information and procedure does not nor shall not be taken as representing (nor intending) to be the approved nor the complying nor the standard method nor procedure for the use of replica tape. It is the responsibility of the reader and/or users of this information to separately determine and verify the correct method and procedure of use as directed or indicated in any work specifications or standards. Blast-One™ expressly disclaims any liability for the use or misuse of the above information and procedure.

Read More Posts

Wet-Blasting Equipment : A Comparison for Industrial Coatings Contractors

Related Content 160 CF Mega MistBlaster Blast Machine, 4-Outlet VertiDrive V700 Blasting Robot Upgrade your EcoQuip® trailer rig to MistBlaster® technology!

Troubleshooting A Runaway Blast Pot

Related Content Mist Blaster® Wet/Dry 6.5CF Blast Machine Options Schmidt BAABS Trigger Rail Deadman System Response G2 Deadman Handle

Add to quote:

Registration is required to create a Quote.

Click Here to Login or Register.

Add to existing quote:

Add to Quote

Add to a new quote:

Send the request

BlastOne says
Thank you for submitting your quote. A sales representative will follow up with you asap.
Share Quote via Email

Share